# Using Custom Cursors with Javascript for a Better User Experience
Have you seen the popular trend where websites use a customized cursor that is different from the standard cursor and makes the site stand out from other websites? You might even be curious about how those cursors are created.
That's something I've had a lot of experience with, starting when I visited the website for the creative and expressive [Studio Job](https://studio-job.com). I was really sucked in. It was unlike anything I'd ever seen before!
And in this article, I'll show you how to make your own custom cursors and discuss when you should use one for your next project. But, before we get started making custom cursors, let's define what they are.
### Why use a Custom Cursor?
- Custom cursors are used in web design to add more personality to your website and also to give the users an awesome experience. This simple addition makes your website stand out.
Consider the following scenario:
>You've been given the task of creating a modern website, such as a portfolio site with animations, parallax effects, and moving items.
>Using a standard cursor on the design will most likely seem out of place.
This is a great example of how a custom cursor may improve the user experience.
- You can also use them to direct visitors to where they should go and what they should do, providing a more engaging experience.
With that in mind, we will create a custom cursor on a landing page to learn how we can maximise this feature for better UX(User Experience).
The image below shows a preview of the final design:

## Prerequisites
This article assumes that you have:
- Knowledge of HTML
- Knowledge of CSS (SCSS)
- Knowledge of Javascript (ES6)
- A code editor and browser
## How do custom cursors work?
We use a custom cursor by changing the default cursor to the image that we want.
Like so:
``` CSS
body {
cursor: url('image-path.png'), auto;
}
```
The next value of the property is a fallback, `auto` which sets the cursor to the default, just in case the image hasn’t loaded or if it can’t be found. Adding this fallback is important so your website won’t be cursor-less.
>The cursor property can also be added to different elements and is not restricted to just the body.
>For example, check out the codepen below:
%[https://codepen.io/israelmitolu/pen/YzEGxbL]
## Creating the Custom cursor
This section has been broken down into different steps to make it easier to understand.
### Step 1: Set up the Project
To code along with me, you can clone or download the [landing page design](https://github.com/israelmitolu/Julia-Portfolio) which is located in the starter folder.
To begin, start the development server in the IDE and open up your browser.
This is the resulting layout, where the custom cursor will be placed.

### Step 2: Add the cursor divs
In the `index.html`, add the following code immediately after the `` tag
``` HTML
```
The first div represents the ball cursor, while the second represents the larger cursor.
Next, we would style these empty divs in CSS
### Step 3: Style the cursor divs
In the `scss/cursor` folder, inside `_cursor.scss`, we will add the styling for the cursor.
First, we style the two cursors.
``` CSS
.cursor-ball {
width: 8px;
height: 8px;
background-color: #000;
}
.cursor-outline {
width: 3rem;
height: 3rem;
border: 1px solid #000;
transition: all 0.5s ease;
}
```
As we progress, you'll see the effect of the `transition`.
The output 👇

Isn't that going to make a terrible cursor? It's all square-shaped and boxy.
As a result, we'll add some styles that are shared by both cursors:
``` CSS
.cursor-ball,
.cursor-outline {
border-radius: 50%;
position: absolute;
z-index: 100;
pointer-events: none;
transform: translate(-50%, -50%)
}
```
The code block above contains a `border-radius` which makes the divs into circles.
We add a `position` of `absolute` so that we can alter the mouse cursors' `top` and `left` locations in Javascript.
The `z-index` of `100` makes the two cursors to be on top of any other element on the web page.
>Note: Make sure the mouse has the highest z-index in any project you implement a custom cursor so that the cursor won’t be hidden at any point in time.
The `pointer-events` of `none` disables any pointer events on the divs, in this case, so that we can select other elements behind the cursor divs. To understand better, see the [documentation](https://developer.mozilla.org/en-US/docs/Web/CSS/pointer-events)
The transform property moves the element to the centre.
Now you should see a bit of the cursor at the top-left corner of the screen.
### Step 4: Move the cursor around the screen
Now, let's get this cursor moving!
In the `app.js` file, we will start by grabbing the elements we need:
``` javascript
let cursorBall = document.querySelector(".cursor-ball");
let cursorOutline = document.querySelector(".cursor-outline");
```
Now, let’s add an event listener to get the exact coordinates of the mouse — when the mouse moves:
```javascript
document.addEventListener("mousemove", (e) => {
cursorBall.style.top = e.pageY + "px";
cursorBall.style.left = e.pageX + "px";
cursorOutline.style.top = e.pageY + "px";
cursorOutline.style.left = e.pageX + "px";
});
```
Because we styled the cursors with a `position` of `absolute`, we can now modify the `top` and `left` properties of both the `cursorBall` and `cursorOutline` dynamically using Javascript.
`e.pageY` returns the coordinates on the Y-axis (vertical) for every event `e` of a mouse moving on the screen.
While `e.pageX` returns the coordinates on the X-axis (horizontal) for every event `e` of a mouse move.
Here’s the result 👇

You’d notice that there is a delay in how the bigger cursor, `cursorOutline` catches up to the smaller cursor. And that is because of the `transition` of `all 0.5s ease` that we added when styling the `.cursor-outline`.
> Side note: You can experiment with different values for the `animation-duration`. Here, we used `0.5s`, and you can even try without any transition property.
Furthermore, to completely remove the default pointer cursor, we would add the following code into the body tag found in the stylesheet `cursor: none`;
This will make sure that only our custom cursor shows.
We can afford to do this because we're working with pure CSS, which loads and renders quickly.
However, if we choose an image that may not load up in time due to a network fault, the User Experience would be poor.
In such scenarios, add the image location `url` and the fallback of `auto`, as we discussed in an earlier section.
Great job so far! 😃
***
This is how our web page should look now 👇

Now, what we've done so far is fine, but I'd like to see us take it a step further by adding more functionality depending on mouse events.
## More Event Listeners
To make the webpage more interesting, let’s add more functionality to the cursor:
### Mouseup and Mousedown
In the `app.js` file, we will utilise the `mousedown` and `mouseup` event types which will listen for when the mouse button is being pushed.
```javascript
document.addEventListener("mousedown", (e) => {
if (e.button === 0) {
cursorOutline.classList.add("cursor-mousedown");
}
});
document.addEventListener("mouseup", () => {
cursorOutline.classList.remove("cursor-mousedown");
});
```
For the `mousedown` effect to work on only the left mouse is clicked, we use the `button` property to select what part of the mouse will be used. Check the [documentation](https://developer.mozilla.org/en-US/docs/Web/API/MouseEvent/button) for more info on the `button` property.
>The code then translates to: “If the left mouse is being clicked, add the class of `cursor-mousedown` to the `cursorOutline`.
>And on the event of `mouseup`, when the mouse is released from being pushed, remove the `cursor-mousedown` class.
Then, head over to the `scss/cursor/_cursor.scss` to add the styling for this new effect:
``` SCSS
.cursor-mousedown {
width: 1.5rem;
height: 1.5rem;
border: 2px solid #000;
background-color: #8454f4;
}
```
This is the resulting effect 👇

### Mouseover and Mouseleave
In the app.js file, to get all the social media links from the DOM, use a querySelectorAll on the parent element of the links:
```javascript
let links = document.querySelectorAll(".social-links a");
```
Now, using the ES6 syntax, the `forEach` method to listen for events on each `social-link` link:
```javascript
links.forEach((link) => {
link.addEventListener("mouseover", () => {
cursorOutline.classList.add("scale-link");
link.classList.add("hovered-link");
});
```
In the code above,
- We’re listening for a `mouseover` event on each of the `link`.
- We’re adding a class of `scale-link` to the `cursorOutline` in Javascript, and later set it up in SCSS
- We’re adding a class of `hovered-link` to the `link` to change the appearance of the individual links when the cursor hovers over them.
The styling for the new classes:
```SCSS
.scale-link {
transform: scale(1.5);
background: #000;
}
.hovered-link {
color: #fff;
}
```
This means that when the cursor hovers over any of the `link`,
- the `cursorOutline` will expand/scale to 1.5 times its original size.
- The `hovered-link` will change the text colour of the links.
This is the result we have 👇

The scaling works alright, but there are a few things you’ll notice:
1. The `cursorOutline` still remains active even though the links were no longer being hovered on.
2. The cursor is no longer centred.
3. The link does not turn white. Did the `hovered-link` class not work?
4. The link goes under the mouse.
These were the challenges I discovered while working on it, and you may experience them as well; here's how I dealt with them.
#### To solve issue #1
This is where we introduce the `mouseleave` event which is fired when the cursor moves out of the target element.
Still in the `forEach` block, add the following code:
```javascript
link.addEventListener("mouseleave", () => {
cursorOutline.classList.remove("scale-link");
link.classList.remove("hovered-link");
});
```
Basically, we just remove the `scale-link` and `hovered-link` when the mouse moves out of the `link`.
#### To solve issue #2
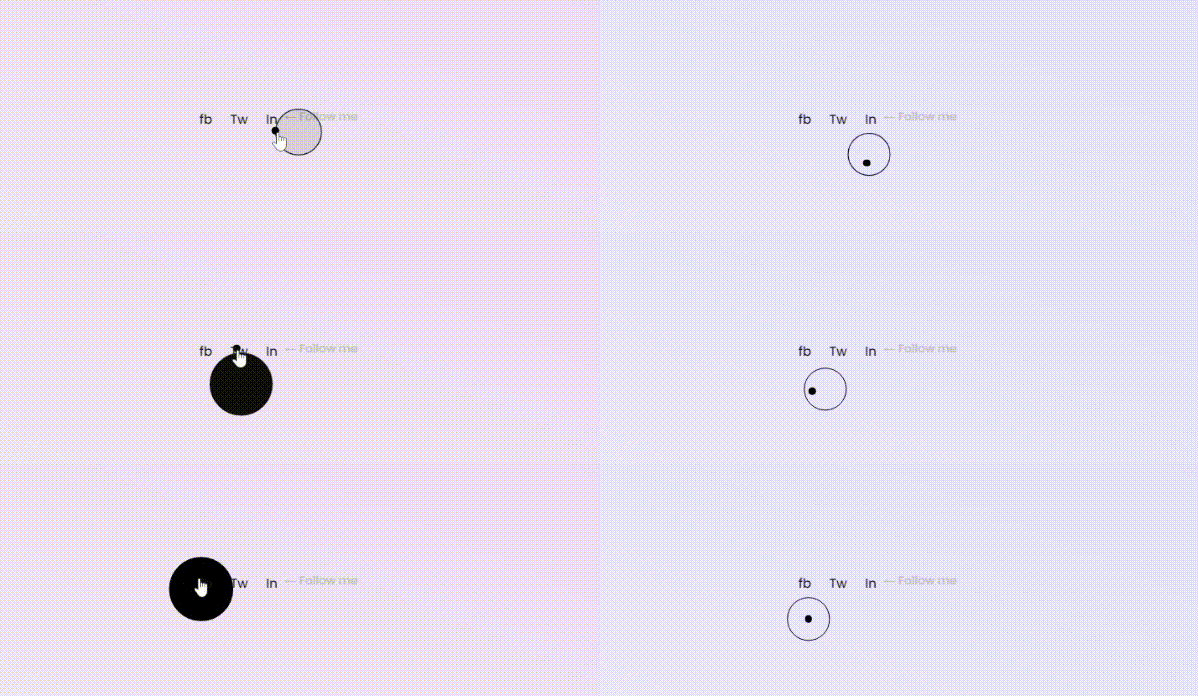
The problem here is that the `cursorOutline` does not scale as it should.
We'll experiment with the `transfom-origin` property here:
```SCSS
transform-origin: 130% 100%;
```
This defines the point around which a transformation is applied. In this case, we set it to `130%` on the left and right, and `100%` on the top and bottom.
Check out [MDN](https://developer.mozilla.org/en-US/docs/Web/CSS/transform-origin) to learn more about this property.
Here’s what we get after solving issues 1 and 2 👇
>**Side note**:
If you want the pointer cursor to be displayed, add `cursor: none;` to the specific element(s)
#### To solve issue #3
The `hovered-link` does work, but if we take a look using Chrome Dev Tools, the actual source of the problem is that the link's colour takes precedence over this new class.
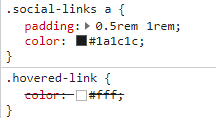
To fix this, we can use the `!important` property, and it will work. But using this property isn’t advisable to use because it generally breaks the natural cascading of stylesheets. It should be used sparingly.
A better option is to be more specific with the styling by using
```SCSS
a.hovered-link {
color: #fff;
}
```
To learn more about specificity and the `!important` property [here](https://developer.mozilla.org/en-US/docs/Web/CSS/Specificity).
#### To solve issue #4
If you recall, we gave our cursors a `z-index` of `100` so that they would be on top of every element on the page, including the links.
So here's a quick fix:
> Add a `z-index` of `100` to the elements to which you want to apply the effect, such as the social media links.
Final Result 👇

Awesome! We were able to resolve the issues we were having. We’re also done adding the custom cursor, and we have explored several interactions using the mouse event listeners. 😎💪
## Responsiveness
Lastly, before we can deploy the project, we need to add a media query that prevents the custom cursor from appearing on devices without a pointing device.
Because not everyone uses a mouse or trackpad, forcing them to use a custom cursor is pointless, thus we must disable it:
In `scss/responsive/_responsive.scss`,
We will create a mixin that we will then **include ** in the `_cursor.scss `
```SCSS
@mixin anyPointer {
@media (any-pointer: fine) {
@content;
}
}
```
Let's include the mixin to `_cursor.scss`, where we've already applied styling for both cursors.
We would set the `display` to `none` by default, and using the `@include` rule, we set the `display` to `block` so that the cursor will be displayed only if the user is using a pointing device (such as mouse or trackpad):
``` SCSS
.cursor-ball,
.cursor-outline {
...
display: none;
@include anyPointer {
display: block;
pointer-events: none;
}
}
```
## Conclusion
Finally, a big yay! 🥳 We've created a cool custom cursor, and you've learned about custom cursors and how they can impact your website's user experience.
If you found this post useful (and I'm sure you did), do well to share this resource with your friends and co-workers, and follow me for more content.
If you have a question or find an error or typo, kindly leave your feedback in the comments section.
Also, kindly share what you think. Do you think it's a good idea to have a custom cursor? Are there any other instances when it won't be required? Leave your response in the comments section.
## Inspirations from the web
- [Iara Grinspun Portfolio](http://www.iaragrinspun.com/#/)
- [Unami Ware](https://umami-ware.com/)
- [Mubien](https://www.mubien.com/)
- [Denton Design](https://natedentondesign.com/)